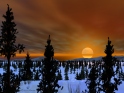
Light from the sun setting reflected from water and melting sea ice just offshore from snowy coastal mountains.
Click on the image for a full-sized view:


Light from the sun setting reflected from water and melting sea ice just offshore from snowy coastal mountains.
Click on the image for a full-sized view:
An orange sun is low on the horizon, last light at sunset, or the first light of sunrise, reflecting off snow-covered peaks. This image produced in Dogwaffle Howler’s 3D landscape renderer.
Click on the image below for a full-size view.

A modified Mandelbulb 3d fractal which reminds me of the Idaho panhandle. There is only 1 fractal in this image. The second and third hills are merely copies of the first; the image was reversed for the second hill. Adjusting the color balance toward the blue and the addition of “fog” gives a sense of depth.

The Green Hills of Earth
Puppy Ray is a ray tracing filter included in recent versions of Project Dogwaffle. It can run in the graphics processing unit (GPU) of a computer. I have recently acquired a new machine which allows me to better utilize the GPU. Here are my first two experiments running Puppy Ray in the GPU.
The first is a night scene. I have a particular liking for such images perhaps because I have spent so much time living in northern latitudes where winter nights are so long. I also like the bluish cast common to snowy scenes and the contrast between dark and light. And the lack of illumination can make successfully putting together a pleasing image can be a challenge.

Then one when the sun is up, fjords. Water planes processed in Puppy Ray are semi-transparent, allowing for more realistic rendering; i.e. you can see down into the water. The refraction index of the water as well as wave height and frequency can also be fine-tuned.
Click on the image for a full-sized view.

Here’s my latest experiment in combining the best features of Howler and DAZ Bryce. An arctic coastline, perhaps Greenland; with the familiar Flying Moose Aviation de Havilland Otter to indicate scale.
The mountains were rendered in Howler. I really like the degree of control one has in developing the texture, or image map, afforded by the use of an image editor such as Howler. Howler’s 3D Designer has two adjustable light sources which can be of different colors, typically orange and blue shades, resulting in very realistic lighting.
The seaside rocks and water surface were rendered in Bryce. I was not 100 percent successful in integrating the two images; a bit of tinkering will be required the next time to improve the results. This image is a study or sorts; I want to make a similar scene depicting the houses typical of coastal Greenland with a whale breaching in the foreground, and improved floating ice.
Click on the image for a full-size view.

Another example of the amazing landscapes which you can make with Dogwaffle Howler. And an unknown something in the air over the mountains.
Click on the image for a full-size view.

Another new toy! Twisted Brush Tree Studio from Pixarra. More thanks to Philip Staiger at thebest3d.com for telling me about it. With Tree Studio you can quickly create 2D trees of several deciduous and conifer species.
A few trees made in Tree Studio added to the recently-posted image of a de Havilland Otter flying over snow-covered mountains gives it an entirely different look and feel. With a bit of work you would have a very nice forest at feet of the mountains. Tree Studio allows you to adjust the colors of the leaves as I have done here so that the birch trees can be in their autumn colors.
Click on the image for a full-size view.

For added realism a few of the png tree images generated by Tree Studio have been warped with another application.
Here is a screen shot of Tree Studio. The leaf color had been changed from the standard green to yellow. Tree Studios works with layers. A layer for the background, a layer for ground cover if, a layer for the trunk, a layer for the leaves. So that trees in the foreground will appear more realistic I suggest deleting the ground cover layer and adding another leaf layer behind the trunk as in this screen shot.

Twisted Brush Tree Studio
Further exploring Howler’s capabilities I rendered the very same landscape in Puppy Ray GPU as was shown in the last post, having been rendered in 3D Designer. Oh my! Taiga forest, I lived there.
Click on the image for a full-size view.

Here’s a de Havilland DHC-3 Otter (which you have seen before), operated by mythical Flying Moose Aviation of Talkeetna, Alaska, flying over a snow-covered mountain range. While Dogwaffle began as a 2D, raster-based paint program, Howler can model landscapes with multiple ray tracing utilities. This image, of stunning, almost photo-realistic quality, was rendered up in the 3D Designer utility. 3D Designer also has the ability to insert localized cloud formations of several types into your image. In this example you can see the leading edge of an approaching snowstorm just beyond the mountains.

Running Ahead Of The Storm
Dogwaffle has an amazing array features – 2D, 3D, particles. There is also a large and growing number of video tutorials to help you figure out how to use them. Look here for more examples in the future including landscapes rendered with the Puppy Ray ray tracing utility.
Like most artists working with digital media I use several software applications. Sometimes I may use as many as six or seven programs to produce a single finished image; especially if it involves 3D modeling – whatever works to get the job done. One program I have used for quite a few years now is Project Dogwaffle. I began with the freeware version and was very impressed; it was also a lot of fun. There have been many updates over the years and I upgrade every so often. A few days ago I upgraded to the latest version, known as Howler. No single application does everything, but Howler is a very sophisticated, though generally easy to use program. In addition to the standard painting functions that you would expect you can also make animations. Special settings for “painting” foliage are also included and some time ago the ability to generate 3D terrains was incorporated.
I have been tinkering with my new toy and thought I you might interested in the results. There will be more examples and explanations of how I use Dogwaffle in conjunction with other software posted here in the coming weeks. I am always experimenting and trying to push the envelope of what can be done. My friend Philip Staiger who helped develop various versions of Dogwaffle will also probably be posting some of it and additional material at his website, thebest3d.com. He has also made some very good video tutorials. My thanks to him for his recent assistance.
As I said 3D terrain modeling has been a feature for some time and, like the other capabilities, it gets better with every new version. The ability to work both 2D and 3D in the same software makes some things much quicker and easier.
Here is the first image I worked up in Howler. I probably should not have put my copyright mark on it as I, more or less, slavishly followed the steps outlined in a video tutorial by Dan Ritchie who developed Dogwaffle. I really like how Howler handles fog.

Desert Sunset
To generate a 3D terrain you need a black and white image where the lighter the shade the higher the elevation; I call this a bump map. Here is a bump map for mountainous terrain. A simple, black and white, overhead image – think topographic map where the lightest shades are the mountain tops and the dark shades are lowlands. These are very easy to make by rendering plasma clouds.

Black And White Elevation Map
Here is a screenshot of the same bump map inside Howler’s 3D designer filter. Notice the terrain is a light neutral color. On the right you can see a panel with some of the many settings you can adjust.

Draft Terrain Render In Howler 3D Designer
The next step is to apply an image map, a texture, to the terrain. This is a simple image map made by again rendering plasma clouds, adjusting the color and adding a rock pattern to make it more interesting and realistic. As with rendering plasma clouds this is quick and easy to do. For the sake of brevity I left out a couple of steps required to add the snow.

Terrain Image Map With Snow
The same image map applied to the terrain bump map in 3D designer.

Image Map Applied To The Terrain
By adjusting a multitude of settings – elevation amplitude, illumination, point of view, etc., etc., etc., anyone can make a nice scenic view.
Here is another doodle I made. Except for the Northern Lights, which I made with other software, everything in this image was done with the Howler version of Dogwaffle on the same manner as outlined above. You can also make some very nice Northern Lights in Dogwaffle.

Aurora Borealis Over Snow-Covered Mountains
One other thing you might find to be interesting.
Here’s a fractal image I made some time ago.

Fractal Star Of David
After running it though the same process as above – I was curious what would happen – this is the resulting image with the illumination set to make the relief more visible.

Fractal Image Rendered As Terrain
I definitely recommend Dogwaffle to anyone, from beginners in digital arts, to professionals with many years of experience.
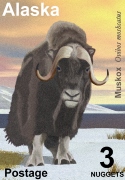
Muskox

Native Alaska

Ice Edge

Winter Eagle

Concentration
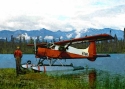
deHavilland Beaver

Afternoon Moose
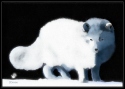
Bright Fox
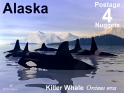
Orca

Wolfpack
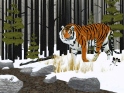
Siberian Tiger

Cold Day in Snezhnii
Taiga

